Ziti-Edge-Router as Gateway
1.0 Introduction
1.1 Network Description
This guide demonstrates how to setup LAN gateways with Ziti-Edge-Router for the purpose of transferring data between non-Ziti endpoints across Ziti Fabric.
There is a video for this demo. The demo here setup exact same network as described in the video.
In addition to the setup discussed in the video, this guide also demonstrates IP intercept in Section 5.0 http Service Configuration.
For the demonstration, we will setup the network like below:
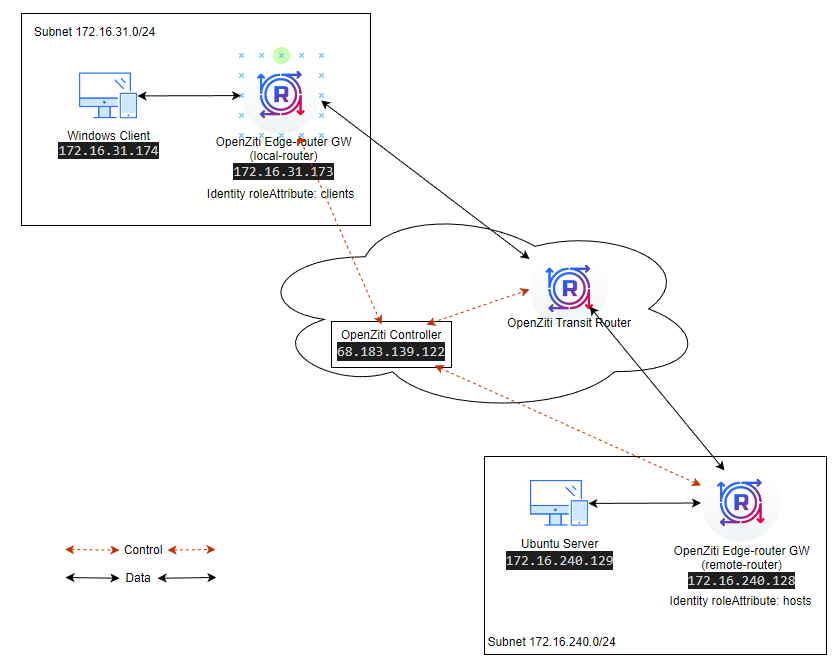
- There are two Ziti-Edge-Routers (local-router and remote-router) as LAN gateways.
- The Windows machine (Windows Client) is in the same subnet (172.16.31.0/24) as Router (local-router).
- The Ubuntu 22.04 server (Ubuntu Server) is in the same subnet (172.16.240.0/24) as Router (remote-router).
- The data (ssh) will be passed between the Windows Client and the Ubuntu Server.
1.2 Prerequisite
Please complete the following steps before continue with this demo.
- An open-ziti network should be created already. If not, please follow this quickstart Host OpenZiti Anywhere guide to setup open-ziti network first. NOTE, the router link listener port (10080) needs to be opened on the firewall if this is the only transit router you have on the network.
- Get the Ziti Controller IP or DNS name
- Get the Ziti Controller Fabric Port: On the controller, issue this command echo $ZITI_CTRL_ADVERTISED_PORT
- Get the Ziti Controller Management Port: On the controller, issue this command echo $ZITI_CTRL_EDGE_ADVERTISED_PORT
- Get the Ziti Controller Passwd: On the controller, issue this command echo $ZITI_PWD
- Created two target VMs to host routers. The VMs should be running on Ubuntu 22.04.
- Created one windows client already. Suggested windows version Windows 10 or Windows 11. Windows servers should work fine as well.
- Created one ubuntu server already. Or any linux server capable of accepting ssh and http connection.
2.0 Setup Routers
2.1 Setup the Router For Windows Subnet
2.1.1 Retrieve auto_enroll script and gather setup info
ssh into your router VM (local-router).
Retrieve ziti_router_auto_enroll to setup your router.
wget https://github.com/netfoundry/ziti_router_auto_enroll/releases/latest/download/ziti_router_auto_enroll.tar.gz
tar xf ziti_router_auto_enroll.tar.gz
You should have a file ziti_router_auto_enroll under the directory.
Here is information I gathered from Prerequisite step:
root@LocalGWDemoNC:~# curl -s eth0.me
68.183.139.122  <--- Controller IP
root@LocalGWDemoNC:~# echo $ZITI_CTRL_ADVERTISED_PORT
8440  <--- Controller Fabric Port
root@LocalGWDemoNC:~# echo $ZITI_CTRL_EDGE_ADVERTISED_PORT
8441  <--- Controller Management Port
root@LocalGWDemoNC:~# echo $ZITI_PWD
Test@123  <--- Controller Passwd
We are going to use Router Name: local-router
We are also going to create the router without healthcheck section and metrics, so the following two options will be used to create the router:
- --disableHealthChecks
- --disableMetrics
2.1.2 Create and Register Router
2.1.2.1 Create Router using one command
sudo ./ziti_router_auto_enroll -f -n --controller 68.183.139.122 --controllerFabricPort 8440 --controllerMgmtPort 8441 --adminUser admin --adminPassword Test@123 --disableHealthChecks --disableMetrics --autoTunnelListener --routerName local-router
What this command does:
- contacts the controller
- creates a router named "local-router" (with tunneler enabled) on the controller
- generates the conf.yml locally
- downloads the jwt file for the router from controller
- enrolls the router with the jwt and the generated conf.yml
- creates the service file to start and stop the router
- and configured the resolver
2.1.2.2 Register Router using jwt
Skip this section if you already created router using one command
An alternative way to register router is creating it on the controller first and then register it on the router VM.
Create Router and retrieve JWT on the controller
zitiLogin
# the followin will create a edge router with tunneler enabled on the controller
ziti edge create edge-router local-router -o local-router.jwt -t
cat local-router.jwt
Copy the output of "local-router.jwt" and register the router on the router VM
sudo ./ziti_router_auto_enroll -f -n --controllerFabricPort 8440 --controllerMgmtPort 8441 --disableHealthChecks --disableMetrics --autoTunnelListener <jwt content>
What this command does:
- contacts the controller using info in the JWT.
- generates the conf.yml locally
- enrolls the router with the jwt and the generated conf.yml
- creates the service file to start and stop the router
- and configured the resolver
2.1.3 Check the installation
You do not have to perform this step if your installation was successful.
2.1.3.1 ziti-router service
systemctl status ziti-router
expected output: The status should show "active (running)"
ziggy@local-gw:~$ systemctl status ziti-router
● ziti-router.service - Ziti-Router
     Loaded: loaded (/etc/systemd/system/ziti-router.service; enabled; vendor preset: enabled)
     Active: active (running) since Mon 2023-05-01 19:51:54 UTC; 1min 48s ago
<... output truncated ...>
2.1.3.2 resolver
resolvectl
expected output: The resolver should be set to the IP of the local LAN
ziggy@local-gw:~$ hostname -I
172.16.31.173
ziggy@local-gw:~$ resolvectl
Global
         Protocols: -LLMNR -mDNS -DNSOverTLS DNSSEC=no/unsupported
  resolv.conf mode: stub
Current DNS Server: 172.16.31.173
       DNS Servers: 172.16.31.173

Link 2 (ens160)
    Current Scopes: DNS
         Protocols: +DefaultRoute +LLMNR -mDNS -DNSOverTLS DNSSEC=no/unsupported
Current DNS Server: 8.8.8.8
       DNS Servers: 8.8.8.8
2.1.3.3 Check Router and Identity
/opt/ziti/ziti edge login 68.183.139.122:8441 -u admin -p Test@123 -y
/opt/ziti/ziti edge list edge-routers
/opt/ziti/ziti edge list identities
expected output: You should see a router name "local-router" after "list edge-router". And there is an identity called "local-router" after "list identities".
ziggy@local-gw:~$ /opt/ziti/ziti edge login 68.183.139.122:8441 -u admin -p Test@123 -y
Token: 0b3a8cc6-dc76-4a94-a502-04380586b49a
Saving identity 'default' to /home/ziggy/.config/ziti/ziti-cli.json
ziggy@local-gw:~$ /opt/ziti/ziti edge list edge-routers
╭────────────┬───────────────────────────┬────────┬───────────────┬──────┬────────────╮
│ ID         │ NAME                      │ ONLINE │ ALLOW TRANSIT │ COST │ ATTRIBUTES │
├────────────┼───────────────────────────┼────────┼───────────────┼──────┼────────────┤
│ .t9Gno26Y  │ local-router              │ true   │ true          │    0 │            │
│ xCW0lSWpcn │ LocalGWDemoNC-edge-router │ true   │ true          │    0 │ public     │
╰────────────┴───────────────────────────┴────────┴───────────────┴──────┴────────────╯
results: 1-2 of 2
ziggy@local-gw:~$ /opt/ziti/ziti edge list identities
╭────────────┬───────────────────────────┬────────┬────────────┬─────────────╮
│ ID         │ NAME                      │ TYPE   │ ATTRIBUTES │ AUTH-POLICY │
├────────────┼───────────────────────────┼────────┼────────────┼─────────────┤
│ .t9Gno26Y  │ local-router              │ Router │            │ default     │
│ lIend76Tu  │ Default Admin             │ User   │            │ default     │
│ xCW0lSWpcn │ LocalGWDemoNC-edge-router │ Router │            │ default     │
╰────────────┴───────────────────────────┴────────┴────────────┴─────────────╯
results: 1-3 of 3
2.1.4 setup ufw
The following steps turn on the ufw firewall and opens the ports for this demo.
sudo ufw enable
sudo ufw allow from any to 172.16.31.173/32 port 53 proto udp
sudo ufw allow from any to 172.16.31.173/32 port 22 proto tcp
sudo ufw allow from any to 172.16.31.173/32 port 80 proto tcp
2.1.5 add attribute "clients" to the identity
We want to add attribute "clients" to the identity associated with the edge router.
You do not need to login again if your token has not expired yet
/opt/ziti/ziti edge login 68.183.139.122:8441 -u admin -p Test@123 -y
/opt/ziti/ziti edge update identity local-router -a clients
expected output: You should see "clients" show up at "local-router" attribute when you list identities.
ziggy@local-gw:~$ /opt/ziti/ziti edge update identity local-router -a clients
ziggy@local-gw:~$ /opt/ziti/ziti edge list identities
╭────────────┬───────────────────────────┬────────┬────────────┬─────────────╮
│ ID         │ NAME                      │ TYPE   │ ATTRIBUTES │ AUTH-POLICY │
├────────────┼───────────────────────────┼────────┼────────────┼─────────────┤
│ .t9Gno26Y  │ local-router              │ Router │ clients    │ default     │
│ lIend76Tu  │ Default Admin             │ User   │            │ default     │
│ xCW0lSWpcn │ LocalGWDemoNC-edge-router │ Router │            │ default     │
╰────────────┴───────────────────────────┴────────┴────────────┴─────────────╯
results: 1-3 of 3
2.2 Setup the Router For Ubuntu Server Subnet
2.2.1 Retrieve auto_enroll script and gather setup info
ssh into your router VM (remote-router).
Retrieve ziti_router_auto_enroll to setup your router automatically.
wget https://github.com/netfoundry/ziti_router_auto_enroll/releases/latest/download/ziti_router_auto_enroll.tar.gz
tar xf ziti_router_auto_enroll.tar.gz
Info for the controller is same as previous setup, please refer to section 2.1.1 for detail.
We are going to use Router Name: remote-router
2.2.2 Create and Register Router
2.2.2.1 Create Router using one command
sudo ./ziti_router_auto_enroll -f -n --controller 68.183.139.122 --controllerFabricPort 8440 --controllerMgmtPort 8441 --adminUser admin --adminPassword Test@123 --disableHealthChecks --disableMetrics --autoTunnelListener --routerName remote-router
2.2.2.2 Register Router using jwt
Skip this section if you already created router using one command
An alternative way to register router is creating it on the controller first and then register it on the router VM.
Create Router and retrieve JWT on the controller
zitiLogin
# the followin will create a edge router with tunneler enabled on the controller
ziti edge create edge-router remote-router -o remote-router.jwt -t
cat remote-router.jwt
Copy the output of "remote-router.jwt" and register the router on the router VM
sudo ./ziti_router_auto_enroll -f -n --controllerFabricPort 8440 --controllerMgmtPort 8441 --disableHealthChecks --disableMetrics --autoTunnelListener <jwt content>
2.2.3 Check the installation
You do not have to perform this step if your installation was successful.
2.2.3.1 ziti-router service
systemctl status ziti-router
expected output: The status should show "active (running)"
2.2.3.2 resolver
resolvectl
expected output: The resolver should be set to the IP of the local LAN.
2.2.3.3 Check Router and Identity
/opt/ziti/ziti edge login 68.183.139.122:8441 -u admin -p Test@123 -y
/opt/ziti/ziti edge list edge-routers
/opt/ziti/ziti edge list identities
OUTPUT:
ziggy@remote-router:~$ /opt/ziti/ziti edge list edge-routers
╭────────────┬───────────────────────────┬────────┬───────────────┬──────┬────────────╮
│ ID         │ NAME                      │ ONLINE │ ALLOW TRANSIT │ COST │ ATTRIBUTES │
├────────────┼───────────────────────────┼────────┼───────────────┼──────┼────────────┤
│ .t9Gno26Y  │ local-router              │ true   │ true          │    0 │            │
│ 967-JQe6s  │ remote-router             │ true   │ true          │    0 │            │
│ xCW0lSWpcn │ LocalGWDemoNC-edge-router │ true   │ true          │    0 │ public     │
╰────────────┴───────────────────────────┴────────┴───────────────┴──────┴────────────╯
results: 1-3 of 3
ziggy@remote-router:~$ /opt/ziti/ziti edge list identities
╭────────────┬───────────────────────────┬────────┬────────────┬─────────────╮
│ ID         │ NAME                      │ TYPE   │ ATTRIBUTES │ AUTH-POLICY │
├────────────┼───────────────────────────┼────────┼────────────┼─────────────┤
│ .t9Gno26Y  │ local-router              │ Router │ clients    │ default     │
│ 967-JQe6s  │ remote-router             │ Router │            │ default     │
│ lIend76Tu  │ Default Admin             │ User   │            │ default     │
│ xCW0lSWpcn │ LocalGWDemoNC-edge-router │ Router │            │ default     │
╰────────────┴───────────────────────────┴────────┴────────────┴─────────────╯
results: 1-4 of 4
2.2.3 setup ufw
For this demo, we only show the connection initiated from local-tunnel side towards remote-tunnel. The ufw rules below are not needed. If you want to have bidirectional connections, you will need to setup these rules.
sudo ufw enable
sudo ufw allow from any to 172.16.240.128/32 port 53 proto udp
sudo ufw allow from any to 172.16.240.128/32 port 22 proto tcp
sudo ufw allow from any to 172.16.240.128/32 port 80 proto tcp
2.2.4 add attribute "hosts" to the identity
We want to add attribute "hosts" to the identity associated with the edge router.
You do not need to login again if your token has not expired yet
/opt/ziti/ziti edge login 68.183.139.122:8441 -u admin -p Test@123 -y
/opt/ziti/ziti edge update identity remote-router -a hosts
Check Identity for modified attribute:
ziggy@local-gw:~$ /opt/ziti/ziti edge list identities
╭────────────┬───────────────────────────┬────────┬────────────┬─────────────╮
│ ID         │ NAME                      │ TYPE   │ ATTRIBUTES │ AUTH-POLICY │
├────────────┼───────────────────────────┼────────┼────────────┼─────────────┤
│ .t9Gno26Y  │ local-router              │ Router │ clients    │ default     │
│ 967-JQe6s  │ remote-router             │ Router │ hosts      │ default     │
│ lIend76Tu  │ Default Admin             │ User   │            │ default     │
│ xCW0lSWpcn │ LocalGWDemoNC-edge-router │ Router │            │ default     │
╰────────────┴───────────────────────────┴────────┴────────────┴─────────────╯
results: 1-4 of 4
3.0 Setup Client and Server
3.1 Ubuntu Server
The Ubuntu Server needs to support ssh (port 22) and http (port 8000) for our demo.
Make sure these ports are open on the firewall.
sudo ufw enable
sudo ufw allow from any to 172.16.240.129/32 port 22 proto tcp
sudo ufw allow from any to 172.16.240.129/32 port 8000 proto tcp
Next, start the webserver. The web server will be listening on the port 8000.
echo "You have reached Remote Web Server." >hello.txt
python3 -m http.server
3.2 Windows Client
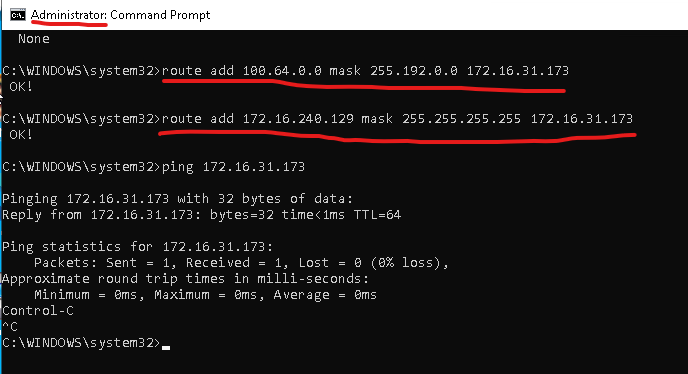
There are two changes we need to make on the windows side.
The first one, we need to change the configuration of the preferred DNS to point to our local-router (172.16.31.173).

The second change is to setup routing.
- We need to route the 100.64.0.0/10 traffic to our local-router. Any DNS based intercept resolved to the IP in the subnet 100.64.0.0/10.
- We also need to route 172.16.240.129/32 to local-router. 172.16.240.129 is IP we intended to intercept and pass through ziti fabric.
To do this, open an cmd window as Administrator.
route add 100.64.0.0 mask 255.192.0.0 172.16.31.173
route add 172.16.240.129 mask 255.255.255.255 172.16.31.173
4.0 Service Configuration
The service configuration can be done on either the local-router or the remote-router.
4.1 Create an intercept.v1 config
This config is used for local side connection. We are setting up intercept on dns name "mysimpleservice.ziti"
/opt/ziti/ziti edge login 68.183.139.122:8441 -u admin -p Test@123 -y
/opt/ziti/ziti edge create config ssh-intercept-config intercept.v1 '{"protocols": ["tcp"], "addresses": ["mysimpleservice.ziti"], "portRanges": [{"low": 22, "high": 22}]}'
4.2 Create a host.v1 config
This config is used for remote side connection. We are setting up the address the remote server can reach. In this demo, We are dropping the traffic off at "172.16.240.129"
/opt/ziti/ziti edge create config ssh-host-config host.v1 '{"address":"172.16.240.129", "protocol":"tcp", "port":22}'
If the config command were successfully, you will see two configs by using "list configs" command:
ziggy@local-gw:~$ /opt/ziti/ziti edge list configs
╭────────────────────────┬───────────────────────┬──────────────╮
│ ID                     │ NAME                  │ CONFIG TYPE  │
├────────────────────────┼───────────────────────┼──────────────┤
│ 3FdpRUpQ2TYinEwURqArpD │ ssh-host-config       │ host.v1      │
│ 3GAjRaE9CcAhdYZiRNpasa │ ssh-intercept-config  │ intercept.v1 │
╰────────────────────────┴───────────────────────┴──────────────╯
results: 1-2 of 2
4.3 Create ssh Service
Now we need to put these two configs into a service. We going to name the service "ssh" and assign an attribute "rtrhosted"
/opt/ziti/ziti edge create service ssh -c ssh-intercept-config,ssh-host-config -a rtrhosted
Check Service by using "list service"
ziggy@local-gw:~$ /opt/ziti/ziti edge list services
╭────────────────────────┬──────┬────────────┬─────────────────────┬────────────╮
│ ID                     │ NAME │ ENCRYPTION │ TERMINATOR STRATEGY │ ATTRIBUTES │
│                        │      │  REQUIRED  │                     │            │
├────────────────────────┼──────┼────────────┼─────────────────────┼────────────┤
│ 48Z59WmcETzhmAwiUGpdwv │ ssh  │ true       │ smartrouting        │ rtrhosted  │
╰────────────────────────┴──────┴────────────┴─────────────────────┴────────────╯
results: 1-1 of 1
4.4 Create Service-Edge-Router-Policy
This step is optional if you used quickstart. The service-edge-router-policy already includes "#all" service roles to "#all" edge router roles as displayed on the screen capture below.
But in case you need to add a policy, here is the command to add the service tag we created (rtrhosted) to all routers
/opt/ziti/ziti edge create service-edge-router-policy ssh-serp --edge-router-roles '#all' --service-roles '#rtrhosted' --semantic 'AnyOf'
Check your service-edge-router-policy, and make sure the policy name "ssh-serp" is created. The automatically created one is called "allSvcAllRouters".
ziggy@local-gw:~$ /opt/ziti/ziti edge list service-edge-router-policies
╭────────────────────────┬──────────────────┬───────────────┬───────────────────╮
│ ID                     │ NAME             │ SERVICE ROLES │ EDGE ROUTER ROLES │
├────────────────────────┼──────────────────┼───────────────┼───────────────────┤
│ 5QzQPx6EUOJXT0hTm26Vuc │ allSvcAllRouters │ #all          │ #all              │
│ PElJS8hQ6E6ykYnRiCJyX  │ ssh-serp         │ #rtrhosted    │ #all              │
╰────────────────────────┴──────────────────┴───────────────┴───────────────────╯
results: 1-2 of 2
4.5 Create Bind policies
We need to specify which identity (in our case, #hosts) is going to host the service by setting up a bind service policy
/opt/ziti/ziti edge create service-policy ssh-bind Bind --identity-roles "#hosts" --service-roles '#rtrhosted' --semantic 'AnyOf'
4.6 Create Dial policies
We also need to specify which identity (in this case, #clients) is going to intercept the service by setting up a dial service policy
/opt/ziti/ziti edge create service-policy ssh-dial Dial --identity-roles "#clients" --service-roles '#rtrhosted' --semantic 'AnyOf'
If both policies are setup correctly, you should see two service-policies.
ziggy@local-gw:~$ /opt/ziti/ziti edge list service-policies
╭────────────────────────┬──────────┬──────────┬───────────────┬────────────────┬─────────────────────╮
│ ID                     │ NAME     │ SEMANTIC │ SERVICE ROLES │ IDENTITY ROLES │ POSTURE CHECK ROLES │
├────────────────────────┼──────────┼──────────┼───────────────┼────────────────┼─────────────────────┤
│ 5cEZw4ZJmoajO68yomA9Hd │ ssh-dial │ AnyOf    │ #rtrhosted    │ #clients       │                     │
│ 5ouEy4ArjXwkwu8xoZJGg5 │ ssh-bind │ AnyOf    │ #rtrhosted    │ #hosts         │                     │
╰────────────────────────┴──────────┴──────────┴───────────────┴────────────────┴─────────────────────╯
results: 1-2 of 2
4.7 Test the service
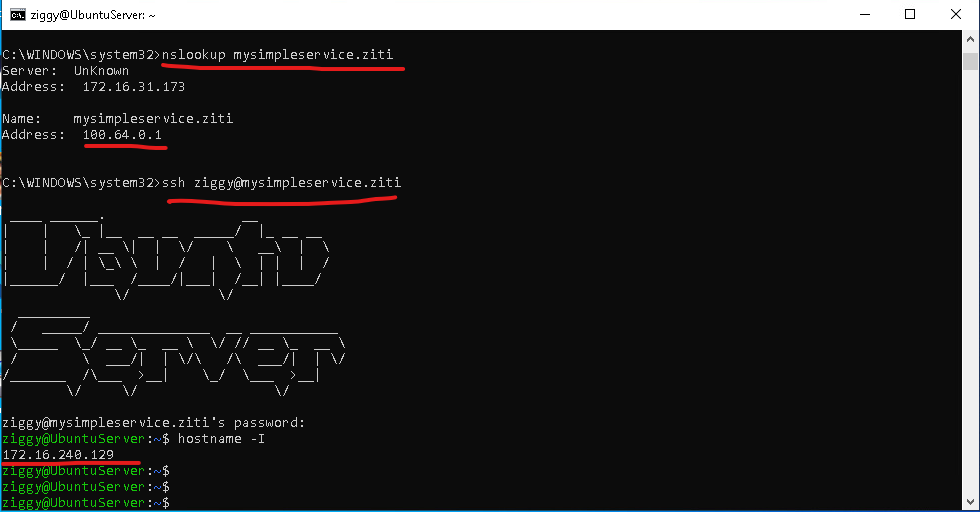
Connect to the Windows Client machine, open a cmd window.
First, try to nslookup mysimpleservice.ziti. This should resolve to a 100.64.0.* address.
Then you should be able ssh to mysimpleservice.ziti.
5.0 http Service Configuration
In the previous section, we showed how to configure a DNS based intercept via open-ziti. In this section, we going to show how to setup interception via IP address. If you followed the instruction in the 3.2 Windows Client section, the routing for the intercept traffic to local-tunnel node is ready set. (route add 172.16.240.129 mask 255.255.255.255 172.16.31.173)
The service configuration can be done on either the local-router or the remote-router.
5.1 Create an intercept.v1 config
Create intercept config on IP: 172.16.240.129 and port 80 for http traffic.
/opt/ziti/ziti edge login 68.183.139.122:8441 -u admin -p Test@123 -y
/opt/ziti/ziti edge create config http-intercept-config intercept.v1 '{"protocols": ["tcp"], "addresses": ["172.16.240.129"], "portRanges": [{"low": 80, "high": 80}]}'
5.2 Create a host.v1 config
Create Host config on IP: 172.16.240.129 and port 8000. As you can see, we have redirected traffic intended for port 80 (from client) to port 8000 (on the host).
/opt/ziti/ziti edge create config http-host-config host.v1 '{"address":"172.16.240.129", "protocol":"tcp", "port":8000}'
If the command finished successfully, you will see two more configs created, their names start with "http":
ziggy@local-gw:~$ /opt/ziti/ziti edge list configs
╭────────────────────────┬───────────────────────┬──────────────╮
│ ID                     │ NAME                  │ CONFIG TYPE  │
├────────────────────────┼───────────────────────┼──────────────┤
│ 1QwmHB69qqvtJKMD3LaUiB │ http-host-config      │ host.v1      │
│ 3FdpRUpQ2TYinEwURqArpD │ ssh-host-config       │ host.v1      │
│ 3GAjRaE9CcAhdYZiRNpasa │ ssh-intercept-config  │ intercept.v1 │
│ 7aEkSQs5eOdXRuVT8aCYDz │ http-intercept-config │ intercept.v1 │
╰────────────────────────┴───────────────────────┴──────────────╯
results: 1-4 of 4
5.3 Create http Service
Put these two configs into a service. We going to name the service "http" and assign an attribute "rtrhosted"
/opt/ziti/ziti edge create service http -c http-intercept-config,http-host-config -a rtrhosted
Check Service
ziggy@local-gw:~$ /opt/ziti/ziti edge list services
╭────────────────────────┬──────┬────────────┬─────────────────────┬────────────╮
│ ID                     │ NAME │ ENCRYPTION │ TERMINATOR STRATEGY │ ATTRIBUTES │
│                        │      │  REQUIRED  │                     │            │
├────────────────────────┼──────┼────────────┼─────────────────────┼────────────┤
│ 2E3LsWbgwo0PiOO67ZyWEP │ http │ true       │ smartrouting        │ rtrhosted  │
│ 48Z59WmcETzhmAwiUGpdwv │ ssh  │ true       │ smartrouting        │ rtrhosted  │
╰────────────────────────┴──────┴────────────┴─────────────────────┴────────────╯
results: 1-2 of 2
5.4 Service-Edge-Router-Policy
Since we used same attribute for http service as the attribute for ssh service, we don't need another service-edge-router-policy. The original service-edge-router-policy was done in this section.
5.5 Bind and Dial policies
We also do not need to create new Bind and Dial policies. Since our host identity (#hosts) and service attribute (#rtrhosted) did not change for bind policy. And our client identity (#clients) and service attribute (#rtrhosted) did not change for dial policy. You can review the policies from the previous section.
5.6 Test the service
Connect to the Windows Client machine, open a web browser. Enter this address (http://172.16.240.129/hello.txt). You should see the text we entered earlier on the ubuntu server
